Internal Nextcloud on a Raspberry PI with SSL
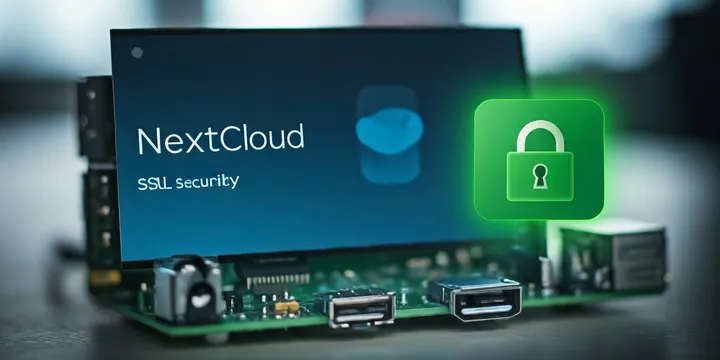
I have replaced my old server "Merlin" with a Raspberry 5 a 2TB NVMe disc and Nextcloud. And since it wants to use HTTPS by default, and I cannot use LetsEncrypt in my local network, I created a tiny CA based on shell scripts.
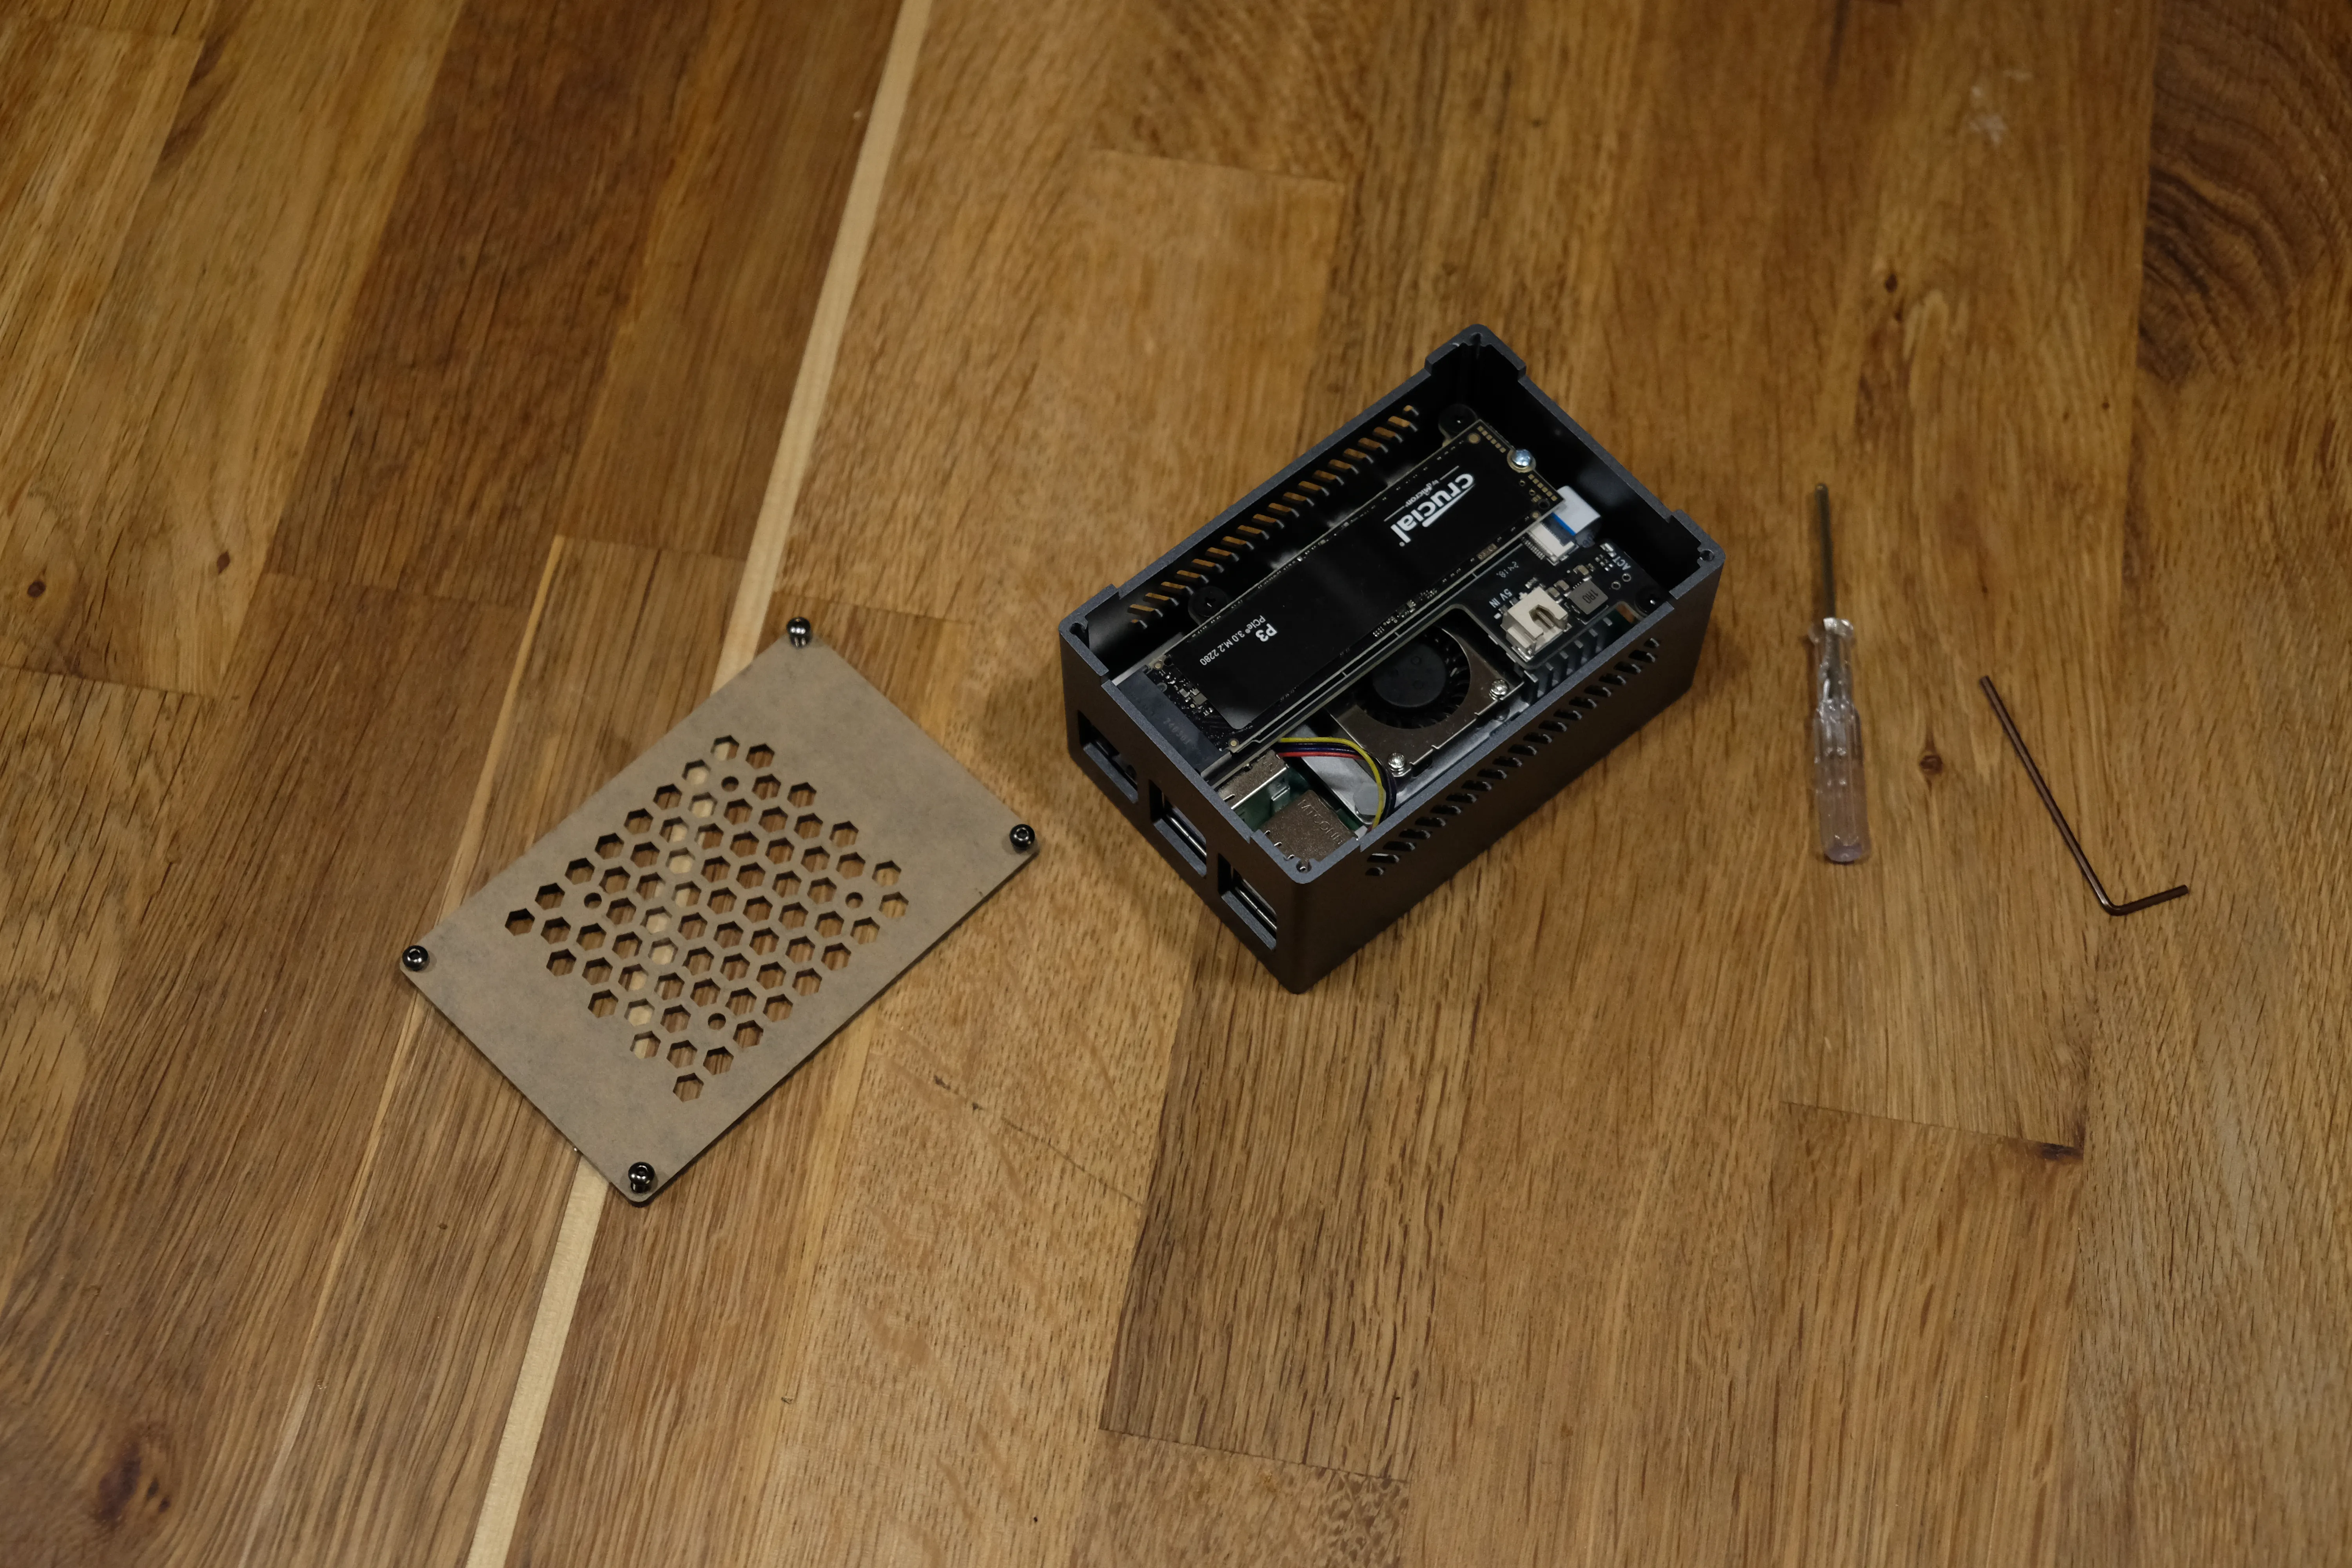
A while ago, my home server Merlin died. He just wouldn’t turn on again. I bought a USB case for four discs, so that I would at least access the data again. But this is very cumbersome to use, if all you want is to quickly look at the family pictures. So I looked around for alternatives and I found out that a Raspberry PI 5 actually has a PCIe 2.0 connector, which can also be switched to PCIe 3.0 speed. There are hats for connecting NVMe discs to this connector and cases that enclose all this. I don’t want to do advertising in this blog. I am writing this mostly as a note to my (future) self. So you will have to find the components yourself, but I can give you the basic list.
- One Raspberry PI 5 board with 8 GB memory.
- One NVMe hat for a single disk. There are hats that allow multiple discs, but all the ones that I found only supported PCIE 2.0 speed. Be sure to look for the speed specs when you search. Some hats also claim to work as boot device, others say that they won’t. This wasn’t something that I cared for much. I just moved all my Nextcloud data to the disc. Maybe I will change my mind there.
- A case that supports the RPI 5 board with the single NVMe hat. I think it was the same producer as the hat.
- The official Raspberry PI 5 fan.
- One power supply with 27W. I don’t understand why, but the power supply of my laptop, which can do 60W, caused reduced voltage warnings.
- I use a 16 GB micro SD card, which is much too large for my purpose.
- One 2 TB NVMe drive. Mine is from Crucial. I mention that, because you can see it on the pictures anyway. I picked it, because it was slightly cheaper than other devices when I looked for it.
Basic setup
So, lets get started, with rpi-imager
tool to write a standard Raspberry PI OS (64 bit) to the SD card. We could use
the Lite version, which does not come with a desktop environment. But the RPI is
very quiet and I might just put it into the living room and connect it to the
projector. It will be even simpler to have a look at the photos and videos, so
let’s install the whole desktop.
After plugging in a screen, keyboard mouse and the SD card, we can click through the basic setup, choosing country, user and password, and default browser.
- Raspberry Pi Connect? No, maybe later.
- Run updates? Not yet.
This we be much faster after we have moved the installation to the NVMe disk.
SSH and the PCIe
Next, we adjust some config options to give us more speed and flexibility for the rest of the installation:
sudo raspi-config- Activate PCIe Gen 3: In order to get better disk speed, we can do this. But if you notice instabilities, disable it again: Advanced options -> PCIe Speed -> Enable PCIe Gen 3
- Activate SSH server: It makes some parts of the installation easier. It
also allows us to transfer SSL certificates to the server, so even if
raspi-configwarns that this is a security risk… Interface options -> SSH -> Activate SSH server. We can harden this later.
Move the installation to the NVMe disk
I decided to use btrfs on the NVMe disk. It gives us some fancy features like
snapshots that help with backup later on. And I also decided (after a some
tries) to have the whole OS on the NVMe disk.
There are some blog posts
ext4 to btrfs conversion,
and about
moving the PI OS to the NVMe disk.
The easiest order I found was the following:
Install btrfs-progs because we need them for the conversion and also later on
the NVMe
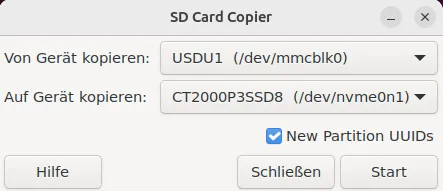
sudo apt install btrfs-progsUse the SD Card Copier program to copy the sd-card to NVMe. Run
piclonethen choose /dev/mmbclbk0 as source and /dev/nvme0n1 as target and select
“New Partition UUIDs”
This alone should already be enough to reboot into NVMe, so let’s try this.
Shut down your RPI, unplug it, remove the SD card and plug it in again. It
should boot, and you can start a terminal and run df to check where to root
file system is mounted from.
If you want, you can update all packages now. It should be pretty fast.
Converting to and booting from BTRFS
We want to use BTRFS for the root partition, and we cannot convert the root partition when it is mounted, so let’s go back and boot from the SD card again.
First, check the designated root partition, then convert it to BTRFS
sudo fsck.ext4 /dev/nvme0n1p2
sudo btrfs-convert /dev/nvme0n1p2
We also need to make sure that the RPI can boot from BTRFS. I missed this at first and my RPI booted into the simple boot shell. Then I found this article by Martin Linten and noticed that I had skipped some important steps.
Mount the nvm partition and chroot into it.
sudo mount /dev/nvme0n1p2 /mnt -o space_cache=v2
sudo mount /dev/nvme0n1p1 /mnt/bootWithout the “space_cache=v2” option, I saw an error and had to follow the instructions at this blog post to fix it:
btrfs check --clear-space-cache v1 /dev/nvme0n1p2Then try mounting again.
Adjust /etc/fstab and /boot/cmdline.txt to use BTRFS instead of ext4
sudo sed -i 's/ext4/btrfs/' /mnt/etc/fstab
sudo sed -i 's/ext4/btrfs/' /mnt/boot/cmdline.txt
Then do some cleanup:
sudo btrfs subvolume delete /mnt/ext2_saved/
sudo btrfs filesystem defrag -r /mnt
sudo btrfs balance start /mnt --full-balance
Install prerequisites to NextcloudPI and some helpers
In my first attempt to install NextcloudPI, the package systemd-resolved was
missing. Also, the installation can take a long time and may change the
hostname, so we should run it inside a screen in case the network connection
is lost.
sudo apt install systemd-resolved screen
sudo reboot
Create a snapshot
At this point, we might want to create a backup of our installation. We are going to boot from the NVMe from now on, but if we create a BTRFS-snapshot now,
I am no BTRFS export, so I may be doing stupid things here. Keep that in mind,
please. Maybe it is better to use a tool like snapper instead of raw BTRFS
commands.
# Create a backup snapshot
sudo btrfs subvolume snapshot -r /mnt/ /mnt/pre-nextcloud-install
# Create a default sub-volume (my file system didn't have any)
sudo btrfs subvolume snapshot /mnt /mnt/fs
sudo btrfs subvolume set-default /mnt/fs
# Remount
cd /
sudo umount /mnt
sudo mount /dev/nvme0n1p2 /mnt
Let’s see if we can restore it: Create any file in the home directory
# Change something
echo 111 > /mnt/test.txt

# Create new default snapshot from backup
umount /mnt
mount /dev/nvme0n1p2 /mnt/ -o subvol=/
btrfs subvolume set-default /mnt
btrfs subvolume delete /mnt/fs
btrfs subvolume snapshot /mnt/pre-nextcloud-install/ /mnt/fs
btrfs subvolume set-default /mnt/fs
Install NextcloudPI
Finally, we can install NextcloudPI.
The official way to install Nextcloud on a PI seems to be https://nextcloudpi.com/. At least the GitHub repo lives in the official org. It also provides a curl-based installer.
Many people will tell you that you should not download a shell-script with
curl and pipe it directly to sudo bash. Any they are right. It could do
anything to your machine. Break anything, install spyware, what else?
But in the end, it comes down to trust. I have to trust Raspberry Pi OS to not contain any malware. I have to trust Nextcloud to contain any malware. Both could easily install anything on my RPI, even if I am not using the curl-installer. So this time I have used it, but on my main laptop, I would be a bit more cautious.
The script takes quite a while to run, but in the end, everything should work
(despite some warnings on the command line). It installs a couple of packages
like mariadb, nextcloud and some tools to manage the Nextcloud installation.
After the installation, the hostname of the RPI is nextcloudpi. In my case,
this did not have an immediate effect, but after a reboot, a couple of minutes
time, my router picked this up and I could not reach the RPI under raspberrypi
any more. If that happens to you, try
ssh username@nextcloudpiInstall https certificates
NextcloudPI supports Let’s Encrypt which does not help me much. I do not intend to put my RPI onto the public internet and I don’t want to use and public domain name, so I needed my own way to create a server certificate.
I found some tools to manage a local certificate authority, but they were either inconvenient to install or too restricted. In the end, I read some blog articles about how to create a CA and created my own repo with a couple of scripts.
You can have a look at this micro-ca on GitHub. I will not go into more detail here, instructions are in the README. The nice thing is, that you can keep it on an SD card and only use it when you actually have to renew a server certificate.
You should be aware that creating a custom CA requires you to import the root-certificate of this CA into all browsers that use, in this case, your NextcloudPI server. An attacker who steals the root certificate can run man-in-the-middle attacks on you by creating valid certificates for servers.
Further actions
There are some more things that you should look at when using nextcloudpi. For
instance, it has a configuration tool that allows you to configure backups and
all kinds of settings.
sudo ncp-configIt also has image recognition apps, to do some automatic tagging.
- https://github.com/matiasdelellis/facerecognition - For this, I had to do some compiling myself. And when trying to use the compiled php-module in the web-server, I noticed that there actually is a PHP service that you have to restart in order to get changes loaded.
- https://github.com/nextcloud/recognize
Conclusion
I am very satisfied with my NextcloudPI instance. I even think that it can do all the things that my Gachou was supposed to do. To me, this means to pressure to go on with Gachou. I can do other things like tools for creating popup cards, but that is a different story.