Self hosted GitLab-Runner in VirtualBox and k3s

When I ran out of CI/CD minutes on gitlab.com, I had to find a solution to run my own GitLab-Runner, preferably so that I didn't have to pay for the computing time. I decided to run it on my own computer.
I have been using GitLab for some years now, and I always liked the integration
of GitLab CI/CD. Unlike GitHub, were you had to use third-party services until
GitHub-Actions where introduced, you could just add a .gitlab-ci.yml file to
run your pipelines.
The best thing though was, that it was free.
But some people apparently had to exploit every possible option to make profit and started using these free processor time to mine cryptocurrency. In response GitLab introduced quotas for the shared runners in gitlab.com.
Until September, I had 400 minutes quota, but one minute only counted 0.08 minutes for me, because my project is public.
Last week, I was caught a bit by surprise when I got a warning, saying that only 30% of my CI quota was left and would I like to buy 1000 extra minutes for $10? That was when I noticed that the factor of 0.08 didn’t apply anymore, starting in October. Now, I have 400 minutes each month, and that is not enough for my pipelines.
I could pay $10 of course. I could also apply for the Open Source Program where GitLab offers an Ultimate plan and a higher quota of CI minutes.
But I decided to dive into the world of virtualization, Kubernetes (i.e. k3s) and Helm, and run a GitLab-Runner on my own computer, because why not…
Security considerations
Running a GitLab-Runner on your own computer poses a certain risk. After all, the runner connects to a GitLab instance (in my case gitlab.com) and runs every job that it ordered to run. Usually, jobs are restricted to docker-containers. But in my pipeline, I use Podman to build docker-images. Those jobs failed when I used docker to run the GitLab-Runner, on my local machine, without privileged containers:
$ podman login -u "$CI_REGISTRY_USER" -p "$CI_REGISTRY_PASSWORD" "$CI_REGISTRY"
time="2022-10-23T20:54:55Z" level=warning msg="\"/\" is not a shared mount, this could cause issues or missing mounts with rootless containers"
cannot clone: Operation not permitted
Error: cannot re-exec process
I don’t know exactly, what happened, but I decided: If I am going to run GitLab-Runner on my own computer, and I need privileged containers, I will do it in a virtual machine. Otherwise, it would be easy to compromise my computer.
Since I already had VirtualBox installed, I used that.
Setup k3s in a VM
At first, make sure that you have the following software installed:
- VirtualBox
- Kubectl
- Helm
- Download the latest k3OS iso-image
- Also make sure that you have a GitHub account with a registered ssh-key, because we will be using this to log in to the VM.
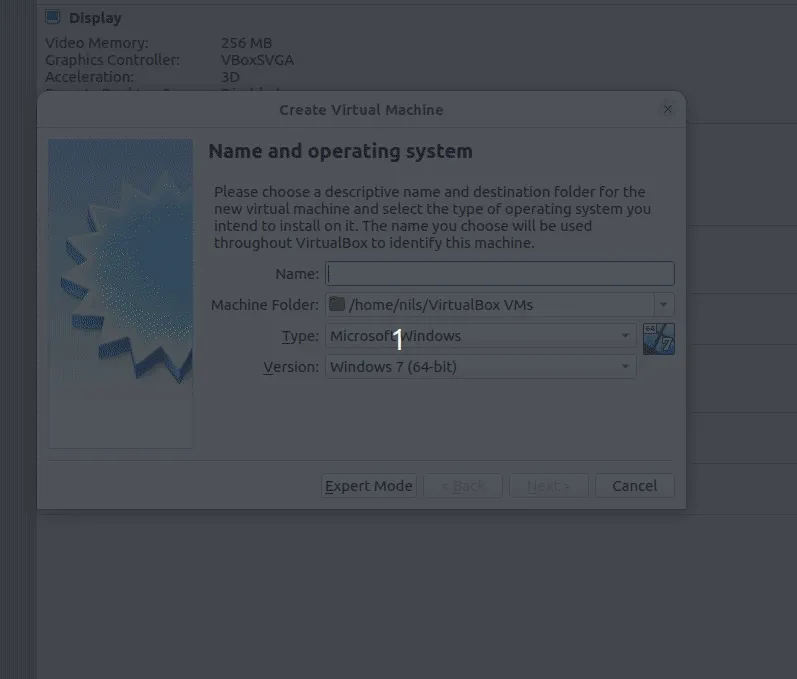
Now, create new VirtualBox VM for the k3s installation. I used the following specifications, but I guess it depends on the jobs you want to run on the machine:
- Linux operating system (Other Linux x64)
- Memory: 16 GB
- Disk: 100 GB (fixed size, because it’s faster)

Port forwarding
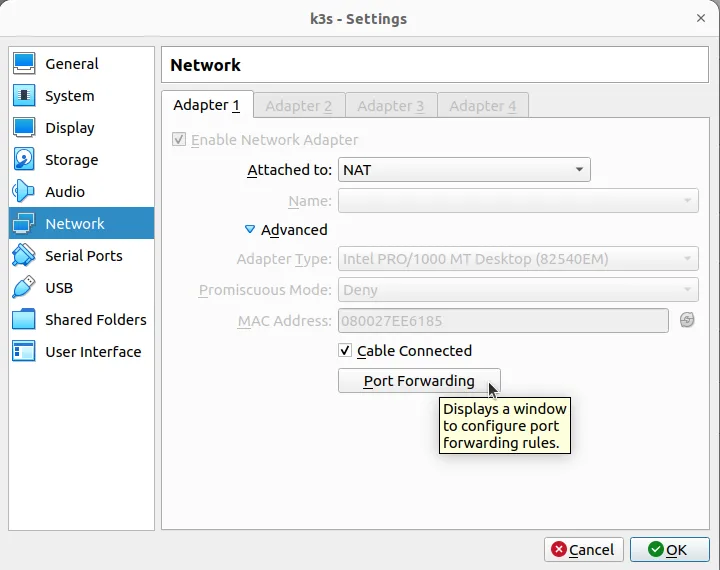
In order to log in to the virtual machine later, we still need to prepare some port forwarding from our local machine to the VM.
Open the advanced network settings in your VM and click “Port Forwarding”

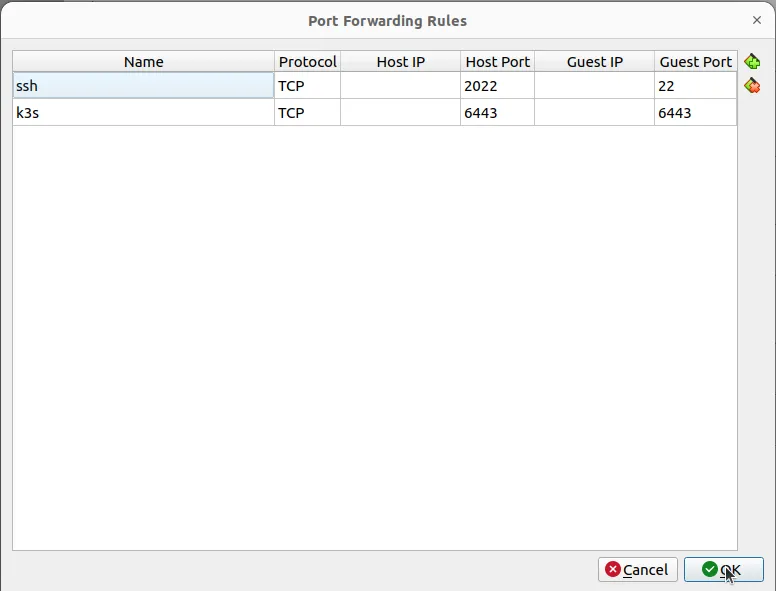
Enter the forwards
- TCP 2022 -> 22 to enable ssh login
- TCP 6443 -> 6443 to enable k3s access via
kubectl

Install k3OS
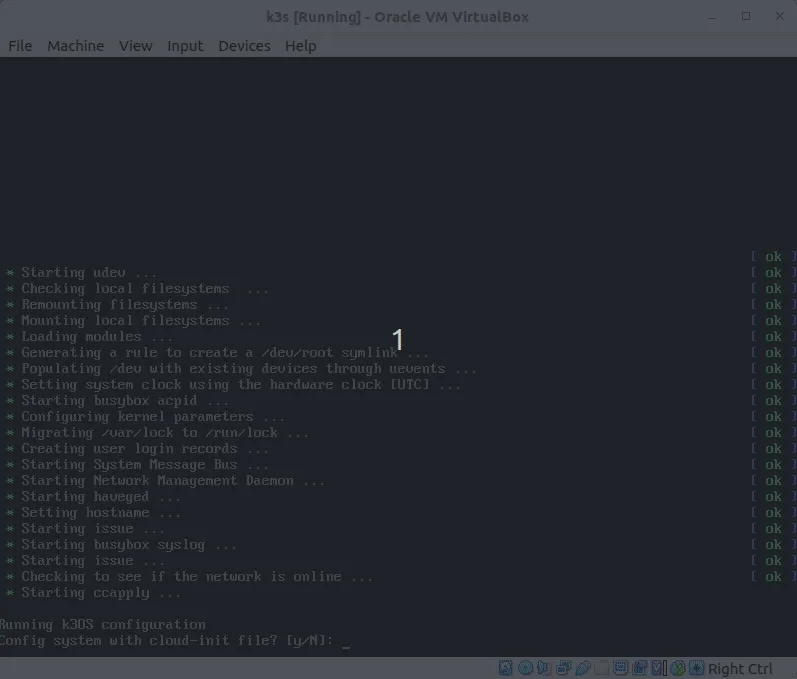
When you start the machine, VirtualBox will probably complain that no boot device was found. Now you can select the k3os-image as optical drive image.
Select “k3OS Installer” from the boot menu. You will be prompted for some information, from which I chose:
- Cloud init -> no
- Authorize GitHub users to ssh -> yes
- Comma separated list of GitHub users -> my own GitHub username (i.e. “nknapp”)
- Configure WiFi -> no
- Server or agent -> server
- Token or cluster secret (optional) -> leave empty
- Continue -> yes

After that, the system will install and the VM will reboot. You have to open the “Devices” menu, deselect the k3os-image and reset the machine in order to continue
Obtain Kubeconfig
Now you can use your GitHub ssh-key to log in to the machine
ssh -p 2022 -i ~/.ssh/your-github-private-key-file rancher@localhostThe Kubeconfig is in /etc/rancher/k3s/k3s.yaml. You can either just copy it
via clipboard or via scp to ~/.kube/config on your host machine.
Make sure that the config has restricted permissions
chmod 600 ~/.kube/configNow, you can verify your setup by running on your host machine
> kubectl get namespaces
NAME              STATUS   AGE
default           Active   4m38s
kube-system       Active   4m38s
kube-public       Active   4m38s
kube-node-lease   Active   4m38s
k3os-system       Active   3m24s
Installing GitLab-Runner
GitLab provides Helm charts for installing GitLab-Runner in Kubernetes. You can basically follow the instructions on their documentation page:
Add the helm chart repo:
helm repo add gitlab https://charts.gitlab.ioCreate a namespace for the runner
Create a file namespace-gitlab-ci.json
{
  "apiVersion": "v1",
  "kind": "Namespace",
  "metadata": {
    "name": "gitlab-ci",
    "labels": {
      "name": "gitlab-ci"
    }
  }
}
and run
kubectl apply -f ./namespace-gitlab-ci.jsonCreate a secret contain the registration token
(see Store registration tokens or runner tokens in secrets)
Go to your GitLab-CI settings page, either in the “group” or in the project and
obtain the registration token. In my case it is GR1348941zVXysfZeuxaV6jyicZzT
(don’t worry, I will change it before posting this blog post).
Create a secrets-file with a base64 encoded token:
> base64 <<<GR244382941zVXysfZeuxaV6jyicZzT
R1IyNDQzODI5NDF6Vlh5c2ZaZXV4YVY2anlpY1p6VAo=
File: gitlab-runner-secrets.yml
apiVersion: v1
kind: Secret
metadata:
  name: gitlab-runner-secret
type: Opaque
data:
  runner-registration-token: "R1IyNDQzODI5NDF6Vlh5c2ZaZXV4YVY2anlpY1p6VAo="
  runner-token: ""
Install it:
> kubectl apply -n gitlab-ci -f ./gitlab-runner-secrets.yml
secret/gitlab-runner-secret created
Create the runner
I used a slightly modified version of the default configuration, stripped of any comments:
image:
  registry: registry.gitlab.com
  image: gitlab-org/gitlab-runner
imagePullPolicy: IfNotPresent
gitlabUrl: https://gitlab.com/
unregisterRunners: true
terminationGracePeriodSeconds: 3600
concurrent: 4
checkInterval: 30
sessionServer:
  enabled: false
rbac:
  create: true
  rules: []
  clusterWideAccess: false
  podSecurityPolicy:
    enabled: false
    resourceNames:
      - gitlab-runner
metrics:
  enabled: false
  portName: metrics
  port: 9252
  serviceMonitor:
    enabled: false
service:
  enabled: false
  type: ClusterIP
runners:
  config: |
    [[runners]]
      [runners.kubernetes]
        namespace = "{{.Release.Namespace}}"
        image = "ubuntu:16.04"
        allowPrivilegeEscalation = true
        privileged = true
  secret: gitlab-runner-secret
  cache: {}
  builds: {}
  services: {}
  helpers: {}
securityContext:
  allowPrivilegeEscalation: false
  readOnlyRootFilesystem: false
  runAsNonRoot: true
  privileged: false
  capabilities:
    drop: ["ALL"]
podSecurityContext:
  runAsUser: 100
  fsGroup: 65533
resources: {}
affinity: {}
nodeSelector: {}
tolerations: []
hostAliases: []
podAnnotations: {}
podLabels: {}
priorityClassName: ""
secrets: []
configMaps: {}
volumeMounts: []
volumes: []
As explanation:
- The
runners -> configvalues contain
because we need privileged containers to run PodmanallowPrivilegeEscalation = true privileged = true - The
runners -> secretvalue refers to the secret we created in the last step.
Install the runner using the command
> helm install --namespace gitlab-ci gitlab-runner -f ./gitlab-runner-values.yml  gitlab/gitlab-runner
NAME: gitlab-runner
LAST DEPLOYED: Sat Oct 29 15:25:19 2022
NAMESPACE: gitlab-ci
STATUS: deployed
REVISION: 1
TEST SUITE: None
NOTES:
Your GitLab Runner should now be registered against the GitLab instance reachable at: "https://gitlab.com/"
You should also see the runner in the runner’s page on your GitLab instance or on https://gitlab.com.
Caveats
This installation is not optimal because it registers a new runner every time the VirtualBox VM restarts. I can live with that for the moment. But if you have an easy way make sure that the runner-token (not the registration token) is persisted in the cluster in a secure fashion, I would be interested. I am not a Kubernetes expert after all.
Troubleshooting
When I wrote these instructions, I had an invalid certificate error while
running kubectl get namespaces. The reason was that I accidentally specified
“Windows” when creating the VirtualBox-VM. This set the hardware clock of the VM
to local time, creating a certificate that would not be valid yet.
Conclusion
I now have (and you can too) a GitLab-CI runner on my local machine. It will help saving CI minutes from my quota on gitlab.com. No need to buy additional CI minutes. I have also gained some practical experience with Kubernetes. That’s positive.
If I had the same problem in my day-time job, I would have paid the $10. Given the pay of a software engineer, the time it took me to set this up and the fact, that I now use resources on my laptop to run CI/CD… Well, it does not sound economical anymore.